Windows 7 Tips & Tricks
Pin Control Panel to Windows 7 TaskBar Hack
Citat:
When user right clicks on Control Panel in Start Menu, there is not “Pin To Taskbar” right click contextual menu item available that allows user to pin the Control Panel to Windows 7 Taskbar. Drag and drop the Control Panel shortcut to Taskbar on Windows 7 to pin Control Panel folder on Taskbar does not work either.
However, Control Panel of Windows 7 can be pinned to Taskbar easily. It’s possible to use the hack to pin any folder to Windows 7 Taskbar for Control Panel. However, there is easier hack. Follow the trick below on how to pin the Control Panel to Windows 7 Taskbar easily.
1.Launch Control Panel (meaning: open Control Panel folder).
2.A Control Panel button should be displayed on the Windows 7 Taskbar. Right click on the Control Panel icon on the Task Bar, and then select Pin this program to taskbar option.
3.Close Control Panel.
4.A Control Panel button is now pinned on Taskbar.
Tip: To unpin Control Panel from Taskbar, just right click on it and select “Unpin this program from taskbar”.
Workaround to Pin My Computer, Documents, Recycle Bin or Any Folders to Windows 7 TaskBar (Pin to Windows Explorer Alternative)
Citat:
In Windows 7, user cannot pin a Computer, My Documents, My Music, My Pictures, My Videos, Games, Recycle Bin or any folder and drive root to Windows Taskbar directly, with the exception of Control Panel. If user attempts to drag and drop the shortcut to a folder to Task Bar, it can’t be dropped into Taskbar with forbidden icon, or been shown option to “Pin to Windows Explorer” instead. Furthermore, when right click on a folder, there is no right click menu item of “Pin to Taskbar” too.
Pin to Windows Explorer may work for some users, who don’t mind have to right click on Windows Explorer icon in Taskbar, and then select the pinned folder or item on top of the Jump List. For Windows 7 users who want the convenient to instantly open a folder such as My Documents by one-click on Task Bar, use the following trick, which similar to change default opening folder of Windows Explorer, to add the favorite folders to Windows 7 TaskBar.
1.Right click on Desktop, and select New -> Shortcut.
2.Visit list of available Explorer.exe special object switches to determine the shortcut value that should be entered. For example, if you want to pin Computer (or My Computer), then enter the following string as the location of the item:
%SystemRoot%\explorer.exe /E,::{20D04FE0-3AEA-1069-A2D8-08002B30309D}
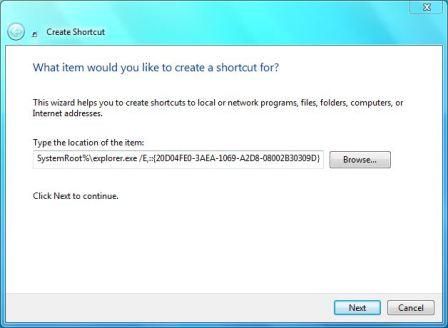
Click on Next when done.
3.Enter a new for the shortcut. For example, Computer.
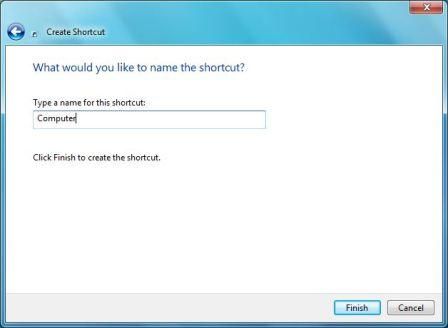
Click on Finish when done.
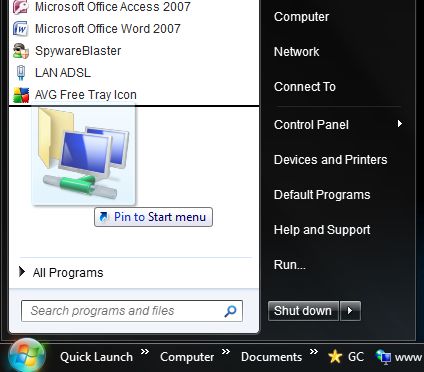
4.A new shortcut will be placed on desktop. Optionally, right click on the shortcut, select Properties. Then click on Change Icon on Shortcut tab to change the icon of the shortcut (which will be used when pinned to Task Bar too).
5.Now, right click on shortcut on desktop, and click on the Pin to Taskbar on right click menu to pin the folder to Windows 7 Taskbar.
Voila, now a folder can be pinned and directly access from Windows 7 Taskbar. To unpin any of these folders, just right click on its button on Taskbar, and select “Unpin this program from taskbar”.
Pin to Windows Explorer may work for some users, who don’t mind have to right click on Windows Explorer icon in Taskbar, and then select the pinned folder or item on top of the Jump List. For Windows 7 users who want the convenient to instantly open a folder such as My Documents by one-click on Task Bar, use the following trick, which similar to change default opening folder of Windows Explorer, to add the favorite folders to Windows 7 TaskBar.
1.Right click on Desktop, and select New -> Shortcut.
2.Visit list of available Explorer.exe special object switches to determine the shortcut value that should be entered. For example, if you want to pin Computer (or My Computer), then enter the following string as the location of the item:
%SystemRoot%\explorer.exe /E,::{20D04FE0-3AEA-1069-A2D8-08002B30309D}
Click on Next when done.
3.Enter a new for the shortcut. For example, Computer.
Click on Finish when done.
4.A new shortcut will be placed on desktop. Optionally, right click on the shortcut, select Properties. Then click on Change Icon on Shortcut tab to change the icon of the shortcut (which will be used when pinned to Task Bar too).
5.Now, right click on shortcut on desktop, and click on the Pin to Taskbar on right click menu to pin the folder to Windows 7 Taskbar.
Voila, now a folder can be pinned and directly access from Windows 7 Taskbar. To unpin any of these folders, just right click on its button on Taskbar, and select “Unpin this program from taskbar”.
Command Line Switches to Display Special Objects or Folders When Opening Windows Explorer
Citat:
When running and opening Windows Explorer, Windows Explorer will automatically display and show the content of a folder, by default is typically My Documents in Windows XP and Windows Server, Documents in Windows Vista and Libraries in Windows 7. User can easily change the default folder that Windows Explorer goes to upon running, by knowing the correct CLSID of the folder or special object.
Windows Explorer, or rather Explorer.exe or only Explorer, is the Windows Shell program which accepts command-line parameters or switches to pass to it in order to assert certain result of execution. As such, Windows Vista, Windows 7, Windows XP, Windows NT 4, Windows Server 2000, Windows Server 2003 and Windows 2008 users can use the command-link switch to start Windows Explorer which shows a different object or folder, such as Computer, Documents, Control Panel, and etc.
Note that some of these special system folders and objects are already available in Start Menu, which is one of the graphic user interface (GUI) parts of the Explorer. For example, in Windows Vista, user can direct access to user folder, Computer, Documents, Pictures, Music, Control Panel and etc right from the Start Menu. The following commands which call specific CLSID namespace of the object or folder is used to change the behavior of Windows Explorer upon running, and can be set in the properties of Windows Explorer shortcut or issue the command directly in Command Prompt.
My Computer
%SystemRoot%\explorer.exe /E,::{20D04FE0-3AEA-1069-A2D8-08002B30309D}
My Documents
%SystemRoot%\explorer.exe /N,::{450D8FBA-AD25-11D0-98A8-0800361B1103}
Recycle Bin
%SystemRoot%\explorer.exe /N,::{645FF040-5081-101B-9F08-00AA002F954E}
Network Neighborhood
%SystemRoot%\explorer.exe /N,::{208D2C60-3AEA-1069-A2D7-08002B30309D}
Default Web Browser or Navigator (IE, Firefox, Safari, Google Chrome)
%SystemRoot%\explorer.exe /N,::{871C5380-42A0-1069-A2EA-08002B30309D}
Computer Search Results Folder
%SystemRoot%\explorer.exe /N,::{1F4DE370-D627-11D1-BA4F-00A0C91EEDBA}
Network Search Results Folder
%SystemRoot%\explorer.exe /N,::{E17D4FC0-5564-11D1-83F2-00A0C90DC849}
Web Folders
%SystemRoot%\explorer.exe /N,::{20D04FE0-3AEA-1069-A2D8-08002B30309D}\::{BDEADF00-C265-11D0-BCED-00A0C90AB50F}
Control Panel
%SystemRoot%\explorer.exe /N,::{20D04FE0-3AEA-1069-A2D8-08002B30309D}\::{21EC2020-3AEA-1069-A2DD-08002B30309D}
Printers and Faxes
%SystemRoot%\explorer.exe /N,::{20D04FE0-3AEA-1069-A2D8-08002B30309D}\::{21EC2020-3AEA-1069-A2DD-08002B30309D}\::{2227A280-3AEA-1069-A2DE-08002B30309D}
Scanners and Cameras
%SystemRoot%\explorer.exe /N,::{20D04FE0-3AEA-1069-A2D8-08002B30309D}\::{21EC2020-3AEA-1069-A2DD-08002B30309D}\::{E211B736-43FD-11D1-9EFB-0000F8757FCD}
Fonts
%SystemRoot%\explorer.exe /N,::{20D04FE0-3AEA-1069-A2D8-08002B30309D}\::{21EC2020-3AEA-1069-A2DD-08002B30309D}\::{D20EA4E1-3957-11d2-A40B-0C5020524152}
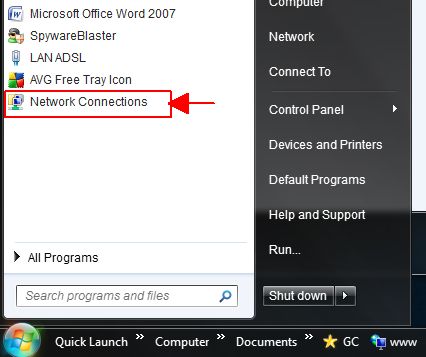
Network Connections or My Network Place
%SystemRoot%\explorer.exe /N,::{20D04FE0-3AEA-1069-A2D8-08002B30309D}\::{21EC2020-3AEA-1069-A2DD-08002B30309D}\::{7007ACC7-3202-11D1-AAD2-00805FC1270E}
Administrative Tools
%SystemRoot%\explorer.exe /N,::{20D04FE0-3AEA-1069-A2D8-08002B30309D}\::{21EC2020-3AEA-1069-A2DD-08002B30309D}\::{D20EA4E1-3957-11d2-A40B-0C5020524153}
Tasks Scheduler
%SystemRoot%\explorer.exe /N,::{20D04FE0-3AEA-1069-A2D8-08002B30309D}\::{21EC2020-3AEA-1069-A2DD-08002B30309D}\::{D6277990-4C6A-11CF-8D87-00AA0060F5BF}
It’s also possible to directly specify the folder or directory for Windows Explorer to show and display when ran, using the same trick to change and set Windows Explorer default folder.
Explorer.exe Command Line Syntax
%SystemRoot%\explorer.exe [/n][/e][,/root],X,[[/Select],Y]
X specifies the object, and optionally with sub-object Y. /e switch showes the left Windows Explorer tree view navigation pane together with the right pane in list view, while /n hides the left navigation pane. When the /root parameter is present, Explorer.eee will explore the root object (X) and objects belonging to X. On the other hand, when the /root switch is not present, Explorer.exe explores the object X, its children, and other Explorer objects as well. /Select switch puts the focus on a file or folder.
For example:
%SystemRoot%\explorer.exe /N,%WinDir%\System32,/Select,%WinDir%\System32\Ping.exe
Command aboves will explore the \Windows\System32 folder and put the focus on the ping.exe program.
Tip: Normally, there is no need to specify full path to explorer.exe, which is stored in the Windows folder, obtainable through the environment variable WinDir, as the path already been defined in PATH environment variable, and will be search through accordingly. As such, Explorer will suffice to run the Windows Explorer shell.
Windows Explorer, or rather Explorer.exe or only Explorer, is the Windows Shell program which accepts command-line parameters or switches to pass to it in order to assert certain result of execution. As such, Windows Vista, Windows 7, Windows XP, Windows NT 4, Windows Server 2000, Windows Server 2003 and Windows 2008 users can use the command-link switch to start Windows Explorer which shows a different object or folder, such as Computer, Documents, Control Panel, and etc.
Note that some of these special system folders and objects are already available in Start Menu, which is one of the graphic user interface (GUI) parts of the Explorer. For example, in Windows Vista, user can direct access to user folder, Computer, Documents, Pictures, Music, Control Panel and etc right from the Start Menu. The following commands which call specific CLSID namespace of the object or folder is used to change the behavior of Windows Explorer upon running, and can be set in the properties of Windows Explorer shortcut or issue the command directly in Command Prompt.
My Computer
%SystemRoot%\explorer.exe /E,::{20D04FE0-3AEA-1069-A2D8-08002B30309D}
My Documents
%SystemRoot%\explorer.exe /N,::{450D8FBA-AD25-11D0-98A8-0800361B1103}
Recycle Bin
%SystemRoot%\explorer.exe /N,::{645FF040-5081-101B-9F08-00AA002F954E}
Network Neighborhood
%SystemRoot%\explorer.exe /N,::{208D2C60-3AEA-1069-A2D7-08002B30309D}
Default Web Browser or Navigator (IE, Firefox, Safari, Google Chrome)
%SystemRoot%\explorer.exe /N,::{871C5380-42A0-1069-A2EA-08002B30309D}
Computer Search Results Folder
%SystemRoot%\explorer.exe /N,::{1F4DE370-D627-11D1-BA4F-00A0C91EEDBA}
Network Search Results Folder
%SystemRoot%\explorer.exe /N,::{E17D4FC0-5564-11D1-83F2-00A0C90DC849}
Web Folders
%SystemRoot%\explorer.exe /N,::{20D04FE0-3AEA-1069-A2D8-08002B30309D}\::{BDEADF00-C265-11D0-BCED-00A0C90AB50F}
Control Panel
%SystemRoot%\explorer.exe /N,::{20D04FE0-3AEA-1069-A2D8-08002B30309D}\::{21EC2020-3AEA-1069-A2DD-08002B30309D}
Printers and Faxes
%SystemRoot%\explorer.exe /N,::{20D04FE0-3AEA-1069-A2D8-08002B30309D}\::{21EC2020-3AEA-1069-A2DD-08002B30309D}\::{2227A280-3AEA-1069-A2DE-08002B30309D}
Scanners and Cameras
%SystemRoot%\explorer.exe /N,::{20D04FE0-3AEA-1069-A2D8-08002B30309D}\::{21EC2020-3AEA-1069-A2DD-08002B30309D}\::{E211B736-43FD-11D1-9EFB-0000F8757FCD}
Fonts
%SystemRoot%\explorer.exe /N,::{20D04FE0-3AEA-1069-A2D8-08002B30309D}\::{21EC2020-3AEA-1069-A2DD-08002B30309D}\::{D20EA4E1-3957-11d2-A40B-0C5020524152}
Network Connections or My Network Place
%SystemRoot%\explorer.exe /N,::{20D04FE0-3AEA-1069-A2D8-08002B30309D}\::{21EC2020-3AEA-1069-A2DD-08002B30309D}\::{7007ACC7-3202-11D1-AAD2-00805FC1270E}
Administrative Tools
%SystemRoot%\explorer.exe /N,::{20D04FE0-3AEA-1069-A2D8-08002B30309D}\::{21EC2020-3AEA-1069-A2DD-08002B30309D}\::{D20EA4E1-3957-11d2-A40B-0C5020524153}
Tasks Scheduler
%SystemRoot%\explorer.exe /N,::{20D04FE0-3AEA-1069-A2D8-08002B30309D}\::{21EC2020-3AEA-1069-A2DD-08002B30309D}\::{D6277990-4C6A-11CF-8D87-00AA0060F5BF}
It’s also possible to directly specify the folder or directory for Windows Explorer to show and display when ran, using the same trick to change and set Windows Explorer default folder.
Explorer.exe Command Line Syntax
%SystemRoot%\explorer.exe [/n][/e][,/root],X,[[/Select],Y]
X specifies the object, and optionally with sub-object Y. /e switch showes the left Windows Explorer tree view navigation pane together with the right pane in list view, while /n hides the left navigation pane. When the /root parameter is present, Explorer.eee will explore the root object (X) and objects belonging to X. On the other hand, when the /root switch is not present, Explorer.exe explores the object X, its children, and other Explorer objects as well. /Select switch puts the focus on a file or folder.
For example:
%SystemRoot%\explorer.exe /N,%WinDir%\System32,/Select,%WinDir%\System32\Ping.exe
Command aboves will explore the \Windows\System32 folder and put the focus on the ping.exe program.
Tip: Normally, there is no need to specify full path to explorer.exe, which is stored in the Windows folder, obtainable through the environment variable WinDir, as the path already been defined in PATH environment variable, and will be search through accordingly. As such, Explorer will suffice to run the Windows Explorer shell.
[Ovu poruku je menjao Catch 22 dana 16.05.2009. u 03:01 GMT+1]